Friday, March 23, 2012

Crap My Friends Make-Cheap and Easy Wall Art


Hello Blog Friends-


I'm sorry it has been so long since my last post. I've been on spring break and then I came back and had to adjust to the real world. But have no fear, I do have several projects to discuss. But until then, here is a very exciting guest blog post from Susan.


Cheap & Easy Wall Art
It’s time for another installment of “Crap Emily’s Friends Make!”


This Crap project is so easy that I am almost embarrassed—seriously, an un-trained monkey could have done it. Now, I know what you are thinking: “Oh sure, Su-Su that is what people always say about crap projects! And then before you know it 6 hours has gone by, I’m tied up in a mess of glue and modge podge with nothing to show for it!”


Well—I am here to tell you that this project is NO JOKE! It really is so easy that you could potentially train your toddlers to do it if you weren’t concerned about them ripping the paper or getting distracted by plastic dog bones, balls and such. (Editor's Note-Ha ha funny Susan. Way to make fun of my kid because he is attached to a plastic dog bone rather than a blankie or something. I'm Facebooking your mom and getting an embarrassing story from your childhood. I won't however tell Little Man what you said because then he would be sad and probably cry.)


I am very fortunate that I actually have a crap room at my house. It’s this beautiful space where I am at peace and spend hours upon hours of time working happily on all my projects. Okay, that is kinda a lie. I really do have a space, I am trying to make it more beautiful and who am I kidding. I never have hours upon hours of time to do what I really want to do which is CRAFT! (I love this room, I want to hide there. Well, now I can't I just told you all my hiding spot.)


I’ve desperately needed some art for one of the walls. Since it’s a craft room I wanted it to be bright, full of color, inspiring and just fun. But let’s face it—I’m cheap! So the thought of hitting up the local Art Galleries (Local Art Galleries-HA! That's funny) in the hopes of finding something really amazing wasn’t an option. I’ve left the wall blank thinking that eventually I would find something that could go there. And then I did—in Staples of all places!


It really is amazing where crap inspiration will hit you. Around Christmas time I was in K-Mart where I got a great idea for a DIY coffee mug to go with an office set I made Emily. I went into Staples to get a mailing tube and saw 2012 calendars on clearance. A Mary Engelbreit one caught my eye and made me think of my crap room! I thought I could take it apart and frame some of the calendar pages. So I bought the calendar and then went to Hobby o’ Lobby to see if frames were on sale (remember: NEVER pay full price for anything at Hobby o Lobby!) Lo and Behold they were 50% off (it’s as if the stars aligned for me to complete this project!)

The supplies:

I took apart the calendar and thought I would need to use my Fiskars paper cutter to cut them down to 12x12 size—but once I had them apart and placed them in the frames they fit perfectly and no trimming was needed! Even better! The instructions here are pretty simple—take apart the calendar. Figure out which prints you want. Pop open the frames and presto! Instant Art! I told you it was easy!

Initially I was only going to do two but then I found a third frame in my crap room that wasn’t being used for anything else—BONUS! So I decided to do a third. They are perfect and just what I needed for the space. The other BONUS is that you could easily change them out with different photos. I also think they would make a fun gift for someone. I think next year I am going to go on the hunt for clearance calendars with this idea in mind.


Here is the finished product on my wall:

Thank you Susan for a great post. However, you forgot to mention one very important supply. What kind of wine were you drinking :)

Friday, March 9, 2012

Cheese Tray

So, a couple of weeks ago my friend said to me "Hey, want to come to this event with me. My husband doesn't want to go. Did I mention there will be free wine?" While she had me at free wine I did have to locate a babysitter since my husband had to present in a class. But seriously, free wine? Umm, yeah. So, I got a babysitter and was in for a nice evening of recognizing women of achievement with other adults in a nice location. Yay!!


Well, we get there and I help with a few things since my friend is on the board and I didn't really mind helping. As it turns out the expectation of the planners was the some of the students involved would bring food and well, only a couple did. So, while drinking my glass of free wine and tasting some of the yummies the couple of students brought Julie said, "I have to go get food, want to come?" Well, since I didn't know anyone and was Julie's +1 for the night I figured I should, plus it would be fun. Off to HyVee we go to get a premade cheese tray.


The already made cheese trays aren't in the deli section, did you know that? And apparently HyVee can't make any ahead of time because they will dry out and get yucky, so if we wanted a premade one, the Hormel ones were over at the other side of the store. Please note, the woman really made it sound like we were terrible people for buying a Hormel tray. Lady, we just left the event we were at on a food run, do you really think we care? Well, after searching we found one lone cheese tray, and it was a sad little cheese tray. I think everyone wanted cheese for the big game last night. Ok, what are we going to do? Maybe the deli can whip one up for us real quick.


Nope, they can't. The young man was very busy and couldn't do that. However, he could give us a tray when we bought our sliced cheese. Alright, we'll take it. As Julie waited on the cheese I went in search of a plastic knife. Luckily I didn't have to look far, there were plastic ware packages right there. So, we buy the cheese, some crackers, and a fruit tray and off to the car we go.


The grocery store was about 6-8 blocks from the event. While Julie drove, I cut the cheese slices in half and arranged them nicely on the tray. Now, while normally I'm all for finding a quick and easy parking space, I was glad Julie had to parallel park (which she does really well, btw) because if she hadn't the cheese tray wouldn't have been done.


When we got in we took the extra cheese to the kitchen and as I was about to take the tray out to the table I was asked by one of the very sweet organizers if I thought we should cut the slices so it went further. I said "There is more, so I think we'll be fine." What I thought was "Seriously lady? The slices are cut and I made this stupid tray in the car. While it was moving!"


Needless to say the cheese tray was a big hit and we had more than enough cheese slices. And a great event honoring some great women.


It was totally a case of go as a guest, leave as the caterer. But it was tons of fun! Plus, there was wine. And a trip to the new wine bar after.


So, here is the now famous Car Cheese Tray:

Oh, and as a bonus, Julie learned how to e-mail pictures from her phone.

Thursday, March 8, 2012

Easter Invite

Just a note-I can't get spell check to work. That is a bad thing for me. I appologize for any mistakes.

I know, you were expecting that my next post would be the second in the decroative towel series. Honestly, so did I. But I just haven't gotten there yet. Now, I don't want to say that my sewing machine and the towel supplies are sitting on my dining room table taunting me, but they kind of are. I need to just sit down and sew. The problem I find is that I can only do that after the little people go to bed unless I want their "help" and sometimes by that time, I don't want to do anything. Call me lazy, I don't care. And anyway, I'm rubber you're glue. Whatever you say bounces off me and sticks to you. Unless of course you say that I'm super awesome, cuz I am. So, my goal is by the end of spring break to have the towels and the potholders done. It could happen.

But anyway, not back to the point of this blog, the Easter Invite. I would really like my family to come to my house this Easter and I figured the best way to make that happen is to use the cuteness of my kids. And they are cute, I mean really cute, but I had to up the cuteness factor to get this to work. Hmmm, what could be cuter than my kids? Think, think, think. I know! Bunnies. So, I put the kids together with bunnies and made my invite. You would think the easy way would be to get some bunnies, put them with my kids, and take their picture. But between keeping the bunnies and my littlest children still and hoping the little people don't freak out if a bunny touches them or even looks at them funny I don't think that would be easy. So, I just decided to Photoshop some stuff. But of course I don't have Photoshop nor do I know how to use it. Plus I didn't want to spend money. So, I found a free program online, http://fotoflexer.com/ I had great fun with this program and I think my card turned out well.


I'm sure that if you are paitent and precise you can cut out the faces very neatly. I have a hard time being precise with my mouse, so that didn't happen. Also, I kept making mistakes and not saving things right and having to start over. I'm sorry I didn't take notes as I did this so you could avoid a similar fate. But, I didn't, sorry.


After I had the image complete I used PowerPoint to make the actual card. Using a blank slide I inserted the picture. Then I created a text box for the text. Once those were complete I grouped them together and saved the slide as a .jpeg This technique also works really well if you want to make a collage of pictures and use that as your desktop wallpaper. You should try it.


But back to the invite. Here is the final product. Pretty stinking cute if I do say so myself.


Wednesday, February 29, 2012

Tea Towel-Part 1

I am so excited to actually be blogging about a crap, I mean craft, project rather than just another dinner. I was all set to start working on this last Friday night after the little people went to bed, but as it turns out dinner, a trip to Wal-Mart, and a trip to JoAnn by myself with the little people after a week of working and being sick just wore me out. So, I watched tv instead.


But last night I was set. This is my first attempt at decorative tea towels. At first I wasn't real sure about my fabric choice but once I got going I thought it was going to be cute.


Here are my supplies:

A set of plain white kitchen towels from Wal-Mart


Decorative fabric-this is black with cherries on it if you can't tell


Coordinating rick rack


Coordinating thread (I didn't use the thread because as it turns out I already had red thread. Why, I don't know, but it matched and I like that thread better so I used it) I did use grey for the bobbin because I didn't have white. I use grey for almost all my sewing when I need something neutral, it works great.


And a can of cider. I went with this instead of wine. I admit Crispin isn't my favorite and I didn't drink it all, but it was still a nice treat.


I cut the fabric into a strip 4 inches wide and the cut it the width of the towel plus 1/2 inch. And as it turns out I wasn't being careful when I cut the fabric so the ruler slid so I had to fix it and the strips ended up being more like 3 3/4 inches wide. Whatever.


I folded each end of the fabric over 1/4 inch and pressed it to make a nice edge.


I figured out where I wanted the strip and put it in place. Great news, I didn't have to pin. The fabric just stuck to the towel like storybook characters on a felt board at the library.


I cut a strip of rick rack about 1/2 inch wider than the towel and was ready to go.


I lined the rick rack up along the raw edge of the fabric and got ready to sew. Things were looking great. I was actually liking the fabric once it was all together on the towel. Zip zip zip a straight stitch along the middle of the rick rack and I was ready to turn the ends under. I removed my towel from my sewing machine and found it to be an EPIC FAIL!


My tension was all wacked out and it totally didn't sew together right. And no, I didn't check part way through. And yes, I know I should do this. So, I had to engage in some antisewing.


At this point, I was done. Defeated. Finished. I didn't want to do any more. So, I put the stuff down to work on another night. Hopefully tonight. So, there will be more to this story, just not now. But rest assured, as with the rice, I will make this towel mine. No, I'm not going to use the naughty word...family blog. Sheesh people.


Oh, as for the tension. I think I know what happened. I keep my sewing machine in my dining room under a plastic cover, not a case, more like a plastic bag. Well, Little Man likes to touch things. I'm pretty sure he found the tension dial and moved it. We'll see tonight when I check to see if it was moved. You might be thinking poor Little Man, getting blamed when he might not have done it. Well, he probably did, and if he didn't he probably did something else that he didn't get caught doing.

Monday, February 27, 2012

This just in...

I have 7 followers!! Let's make it 10 people. Wow, if I had 10 followers I would feel super popular. I need to get out more.

Chicken and Spinach Pasta Bake

Ok, so first things first, I totally wasn't planning on blogging about dinner tonight. I really wasn't. Then I sent Susan a text to tell her I made a great Pinterest dinner and she said she couldn't wait to read about it on 52W. Great, no pressure there. But since I only have 5 followers I probably shouldn't disappoint one or I'll only have 4. And since 4 is less than 5, that would make me sad. BTW 6 is more than 5 and that would make me happy, so tell a friend. Apparently I do blogs on request.

The only picture I have is of half a pan of casserole. I'll post it later as an update, I honestly just don't feel like dealing with that right now. I'm tired and I'm watching Yo Gabba Gabba, a girl can only handle so much.

But anyway, let me share my casserole with you. The original recipe was found via Pinterest and can be found at http://www.savingmoneylivinglife.com/2010/06/chicken-spinach-pasta-bake.html

The main difference was that I used spaghetti instead of rigatoni because that is what I had on hand. I also forgot the salt and pepper.

So, here is what I did.

I cooked 4 chicken breasts in the crock pot yesterday. When I got home today I put on a big pot of water to boil and put about 1 tablespoon of olive oil in a 9x13 pan with 1 cup of chopped onion (I love the bags of frozen chopped onions) and baked at 375 until the onions were soft. Ok, they got a bit brown. Next time I would use more onions, I didn't measure and I don't think I had a cup. So, by now the water is boiling and I cook just about 1 box of spaghetti. Next time I think I would use 3/4 of a box, or maybe even half. Then you mix the chicken which is chopped, 1 box of thawed frozen spinach (drained well), the onion, a container of garlic herb cream cheese ( I used Aldi brand). At first I couldn't get it to mix, then I microwaved the cream cheese until it was soft which helped a lot. Oh, I also added a can of Italian chopped tomatoes-drained. Dump it into the pan and top with mozzarella cheese. Bake covered at 375 for about 20 minutes, uncover and bake until the cheese is melted.

Like I said, I really liked this. My husband did too. Don't know so much about big brother, he had a band thing so he had a grilled cheese since dinner wasn't done. I doubt he'll like it, but you never know.

Ok, that is all I have to say. Susan, I hope you enjoyed this blog post. If it were a video post you would all see me trying to keep the little people from helping and hear the great songs about not playing in the road provided by the talented crew of Yo Gabba Gabba. And I don't care what the lyrics say, I'm pretty sure that they say Foofa, she's freaking happy not pink and happy. Seriously, check out the intro on Youtube sometime and tell me that isn't what it sounds like. Oh, and also, it really bothers me that you can see the zippers in the Yo Gabba Gabba costumes,

Alright, enough about YGG. Make this casserole, it is good.

Wednesday, February 22, 2012

Lent


Well friends, it is Lent. If you are Catholic it means giving something up. Sacrificing like Jesus sacrificed for you. If you aren't Catholic means trying to figure out why Catholics think giving up candy is a sacrifice even remotely similar to what Jesus did. And here in lies my dilemma. I was raised Catholic but now I consider myself Lutheran. So, to give up or not to give up, that is the question. (And here you thought the question was "What's for dinner?")


So, here is what I have decided. I'm going to have several Lenten goals that will hopefully help me to be a better person. Here they are...


1. Be the better person (note, not a better person; the better person)

2. Be healthier

3. Be more organized

4. Be more spiritual


Great you say, but what did you make? Well, I made fliers for two of my goals. It is much easier to have Lenten goals if they are on snazzy fliers, Susan said so. And she is smart so I believe her.


I plan on putting a flyer for each on my refrigerator as a daily reminder of what I'm doing. I will be making a flyer with a quote from Mother Theresa (thanks Susan) that I will probably have as my desktop background.


But here are my fliers.


I tried to come up with snappy names, heck I even went old school and got out my thesaurus, but I couldn't come up with anything, so it is what it is.


Whatever your Lenten/Spring plans are, I hope they work out for you. And remember, things are easier to do with a snappy flyer.

Tuesday, February 14, 2012

Craft Hope

Hello-
I usually share a funny project or meal that I've been working on on this blog. I will continue to do that but today I wanted to share something that someone else is doing.

Today I came across Craft Hope http://www.crafthope.com/2012/01/project-16-the-littlest-warriors/ Craft Hope is a project that shares handmade gifts with those in need. The posts I read brought tears to my eyes.

I wanted to share this site because today, on Valentines day I realize how lucky I am to have three little people and a husband in my life that I love so much and that love me back. I also realize how lucky I am that they are all very healthy and happy. Unfortunately, this isn't true for everyone.

Craft Hope's current mission is to provide handmade bags and beanies for children undergoing cancer treatment.

Please visit the Craft Hope website to see if you can participate in their mission.

I'm hopefully going to make a football beanie (or maybe a couple) and a t-shirt bag or two to send along. If you aren't a big sewer but want to help anyway, check out the t-shirt bag, they look very easy to make
http://www.leethal.net/zine/?p=1344 (No sewing option)
http://www.instructables.com/id/FASTEST-RECYCLED-T-SHIRT-TOTE-BAG/ (this one requires very little sewing)

You can also find videos on making these bags on Youtube.

Monday, February 13, 2012

Cookie Cups


Anyone with children knows the danger of a car ride. No, I'm not talking about an accident, no, I'm talking about something much worse. The not a nap, nap. It happens when it is right around nap time and you have to get from someplace home and the kids fall asleep for a very short time. No matter how hard you try, you can't get them into bed without waking them up. And then they are up. You know the truth, they didn't really nap, but to them, that nap was just the refresher they needed.


Saturday Susan and I went to Boone and were coming home right around lunch time. The plan was to stop at McDonald's so the kids could eat and then if they napped on the way home at least they got some sleep. Well for whatever reason McDonald's was really crowded so we were just going to eat at the one at home. This change in plans meant that the kids were going to ride in the car for about 20 minutes right around nap time. That would be death to any nap that afternoon and we were having a play date so they needed naps. My solution was to stop at the gas station and get the kids some cookies so they would eat their cookies and stay awake. Brilliant! One problem, the gas station didn't sell the cookies in a cup. I knew that just giving the kids a handful of cookies could only end in disaster so, I did what any desperate mom with a pink Swiss Army knife would do, I made some.


When I got to the car I think Susan was a little worried because I turned the car off and started attacking some empty cappuccino cups with my pocket knife. I was too busy to explain what I was doing so she was just going to have to wait a minute. After I finished cutting the cups up and put some cookies in them my madness made more sense.


And it worked. The kids ate their cookies and stayed awake until we got to McDonald's where they ate a surprising amount of food. They did have the rest of their cookies on the way home (keeping them awake across time). I think Catherine was excited because when she left the van she only had 1 cookie left but when she got back in there were 2. Little did she realize we just switched sides of the van so she was actually eating Carter's cookies.


Here are the very fancy cookie cups and some little people enjoying their treats.


Wednesday, February 8, 2012

Frosting Fudge AKA Pinterest Fudge AKA...


Two Ingredient Fudge AKA Was This Really That Easy Fudge AKA No Freaking Way Does This Really Only Have Two Ingredients Fudge.


I think you get the point.


The Pinspiration for this fudge was this blog post http://cookiesandcups.com/strawberry-2-ingredient-fudge/


Sorry for the delay in posting the link. I had to look it up on my Pinterst board and well, you know what happens when you sign onto Pinterest...time escapes.


While I really like the concept of the strawberry fudge and thought it was super cute, I just wasn't sold on the strawberry part. Sometimes artificial fruit flavor just isn't my thing. But sometimes it is, I can't explain it so I'm not going to try. Anyway, I thought I this could be a way of combining three things I love and always make me happy peanut butter, chocolate, and Pinterest. I filed that thought away until I could make some fudge.


Well, my friend Susan came over the other night for a very exciting dinner of crockpot ham and potaotoes and asked what she could bring. Now, the usual response is either wine, cupcake vodka, or dessert. This time I said "Hey, how about we try that Pinterest fudge I pinned and you repinned. Want to bring the stuff for that. Well, since it involves three things she also loves (peanut butter, chocoalte, and Pinterest) she was on board.


We ate dinner and paitently waited for the kids to go to bed (seriously, just go to bed already we have fudge to make) and then got to cooking...if you can call it cooking.


Here are the supplies:


A bag of peanut butter chips

A can of chocolate fudge frosting

2 glasses of Big House Naked Chardonay

(the only Chardonay I like)


Now please note, we used store brand supplies and it didn't matter. You don't have to go all fancy pants and buy the expensive name brand stuff. You could, but then you would just be showing off. If you are going to do that you should probably just go ahead and buy expensive wine and wear diamonds while you make this stuff. And then you should probably call it "Fancy Pants Fudge" because you were being fancy pants when you made it.


Ok, I'll stop now.


All you do to make this great fudge is melt the peanut butter chips in the microwave. Now remember 30 seconds, stir, 30 seconds, stir until it is all melted. Chips won't look like they are melted when you use the microwave, you have to stir. If you just keep microwaving you will end up with a burnt, nasty, smelly mess. Not good.


Once you have the chips melted stir in the frosting until it is well blended. Pour into a greased pan and let set for about 30 minutes. Or, put it in the freezer until it is set enough to eat. Please don't ask what size pan. I think the recipe calls for a 9x9. I couldn't find my 9x9 or 8x8 but I did know where the approximatly 8x6 was, so I went with that one. I think just about anything smaller than a 9x13 would work-it just depends on how thick you like your fudge.


And here it is:

Please note the lovely cake plate. I started cutting squares to put all nice on the plate so I could have a pretty picture. Then I found the fudge wasn't really set up so it wasn't coming out of the pan in nice neat squares, it was taking long, and well we didn't want to wait. So, Susan had the brilliant idea of just putting the pan on the cake plate. That way I still get credit for trying.


I love this fudge. The peanut butter was very subtle but still there. You could use any combination of chips and frosting to see what would happen. And if you wanted it to be all fancy pants you could add nuts, or chips, or whatever. You could also line your pan with parchment or wax paper so it would come right out and you could cut it in nice squares. Yeah, I know, pretty fancy pants.

Wednesday, February 1, 2012

Ham and Broccoli Casserole

Ok, so I know what you are thinking. "Another food post. Seriously? I mean this is supposed to be 52 Weeks of Crap, not 52 Weeks of What I Make for Dinner." And I agree, when I started this blog I really had intended for more of the posts to be about craft project. But then reality set in. The reality is that I don't always have time to work on my craft projects but I always have to make dinner. And if you ask my children they will say that sometimes dinner can certainly be considered crap. I usually don't think so, but sometimes it is true. We aren't going to talk about my attempts at baked mac and cheese. But I will say this "Someday mac and cheese I will win!" But for now we aren't talking about it.


This casserole is really good. However, I do admit it isn't a meal you can feel good about feeding your family if you are really concerned about nutrition. Which I am, but sometimes you need to make things that you can feel good about because your family actually ate it. Plus, this has broccoli so it is kind of healthy.


I must say that I did not come up with this recipe, but for the life of me I cannot figure out where I got it. I had it posted as a note on my Facebook page and it just took me 10 minutes to find it with the new timeline view. But I found it, phew. It would have been a sad day if I had lost this one.


Here is what you need:

2 1/2 cups uncooked elbow macaroni

3 cups chopped broccoli

1 can cream of mushroom soup

1 can cream of chicken soup

2 cups cubed cooked ham

2 cups shredded cheddar cheese

1 cup shredded mozzarella cheese

2 tbl dried onion

1/2 tsp pepper

2 cups crushed potato chips


Cook the macaroni. In a large bowl combine the broccoli, soup, ham, cheeses, milk (now this is funny I'm copying the recipe which calls for milk but I have no milk on the ingredient list...well, skip the milk, I didn't use it this time), onion, and pepper. Drain the macaroni and add to the ham mixture.


Place in a greased 9x13 pan and top with chips. Bake at 350 for 30-45 minutes (just until it is hot and bubbly-this will depend on your oven).Ok, so when I made this I doubled it, so the recipe you have is doubled. If you double this you will have A LOT of casserole. Which is fine if you want to freeze one or have teenager boys in the house. I use frozen broccoli and pour the hot water over the broccoli to thaw it. Also, I add a bit of cheese on the top before I put the chips on. Who doesn't love a little more cheese? Finally, last time I made it I think I added an extra can of soup because it didn't look wet enough. Maybe it was because I didn't add the milk.


Once again, this is a casserole not rocket science, so don't make it too difficult. Coming up with ideas for dinner is hard enough, actually making dinner shouldn't be.


I'm pretty sure there was something else I was going to share, but I can't remember what it was. So, it couldn't have been too important, right?
Oh, I remember! I wanted to confirm that I didn't say this was a healthy dinner :)


Tuesday, January 31, 2012

UFP #1-Quilt Top


I love to quilt. I love picking out the pattern, figuring out the fabrics, cutting it, and putting it together to see what I came up with. The problem is time. With the little people it always seems there is something else to do. I find the best time for me to get any quilting done is when I go to a two day mini retreat at the local quilt store. This is a fun time to do nothing but sewing. Plus, when I get stuck there are lots of people there to help. I do admit, I have major sewing machine envy when I go to these retreats, but I'm getting over that.


The last retreat I went to I started a Twister quilt. This quilt is super cute, looks way hard, and is actually pretty easy. This website shows a tutorial on how to make a Twister quilt http://www.joscountryjunction.com/?p=1148 I can't remember the brand for the tool or I would link to that page. Essentially you make a quilt, cut it apart, and then make a new quilt. I went home from the retreat with the cut up quilt ready to be resewn. I got the strips made but didn't get them put back together for a long while. This quilt top became my first UFP (Unfinished Project).


This is what I started with


Basically it was strips that needed to be sewn together. I had a couple already put together, but about 6 left to go.


This is what I ended with It is pretty hard to see all of it because it is big, but I love this quilt. I think the colors are amazing and it is just so few. I'm so glad I took someone's suggestion and put the pinwheels in a row, I think that really makes the pattern pop.


So, the quilt top is complete. That moves the quilt from an UFP to a MFP (Mostly Finished Project). Now comes the part I do not like. I have to quilt it. I get so nervous when I have to do this part. When I took my first quilting class and we were being shown how to finish our quilts I nearly cried while I was quilting it because I was getting so anxious. Then the quilt I was working on had to stay in my car for a couple of weeks because I didn't even want to look at it. I did finish quilting it with a much easier pattern, but it is still an UFP because I don't like hand sewing the binding. I love making quilt tops, not so much the rest of the process.


I have everything I need to finish this up sitting on my table at home. I hope to get it quilting this week/weekend and the binding on next week so I can have this be completely finished. It is going to be tough, but I'll make myself do it. Now, if I can just keep this cold that sent me to bed at 8:30 last night away, I might actually have a chance at getting things done.

Monday, January 30, 2012

Crap I Wouldn't Have to Make

While reading one of my favorite blogs "Real Mom Kitchen" (www.realmomkitchen.com) I saw that she is having a give away for a gift certificate to Olive Garden. Now really, who doesn't love Olive Garden? Plus, if I won I totally wouldn't have to make dinner.

So, one way to get an added entry is to blog about the contest. And that is what I am doing.

If you have a few minutes, head on over to Real Mom's blog. It has some really good looking recipes. I know I've made stuff from her blog but now I can't think of what it was. But whatever it was, I'm sure it was good :)

Sunday, January 29, 2012

Latte Mix

You know there is something really nice about waking up and starting your day at 5:45. You have such a chance to get things done and have the rest of the day to just relax.

WHATEVER! It is freaking 6 am and I would much rather be in bed. As for getting things done, that might happen...in an alternate universe. My problem is that I have two little people who want to help with whatever I'm doing and I can't run errands because when everyone is dressed and fed it is still on 7:30 and places aren't open yet. Really annoying.

Mornings like this call for one thing. And since it is frowned upon to mix up some pineapple upside down cake and leave the kids with a snack in front of the Wiggles, I'll have to settle for some coffee.

This year I decided that I'm really going to try to save money by not buying fancy (or even regular) coffee on campus. I'm going to make it in my office instead. So far this has been going really well. Then I decided I didn't want to spend as much on latte mix that I have been so I should probably just make my own. So, I did. If I can find the receipts I'll do a price breakdown, but if I can't we'll just say it is less expensive. I really am pretty sure it is.

So, here is what you need:
Side note: Is it really necessary for the Wiggles to go a cover of the Banana Boat song? Apparently it is. And my kids like it because Wags the Dog has a starring role.

And now back to your regularly scheduled blog:
1/2 cup instant coffee
2/3 cup sugar (no pictured...when I took the picture I knew I was missing something)
1/2 cup dry milk
1/4 cup powdered creamer
1/4 cup (about 1/2 small box) instant pudding

Mix everything together in a bowl and then put it in the blender and blend until it is a fine powder. Blending it will keep it from separating as you store it.

I made two flavors, French Vanilla and Butterscotch. I really like the butterscotch. But you can use whatever flavor or flavor combination of pudding you would like. You can also add cinnamon or nutmeg or whatever to add to the flavor.

I like how customizable this recipe is. In the future I would like to make some decaf (a few too many cups of this is not a good thing) and maybe some sugar free using Splenda and sugar free pudding. I'm not sure if you would still use 1/2 a box of pudding or the whole thing. It might involve some experimentation.

Also, a Cookie Butter jar from Trader Joe's is the perfect size for holding this mixture. But I don't suggest you go out and buy any cookie butter for the jar. Not that it isn't amazingly good, but because I need to go get some and I don't want them to be out :)

Ok, I'm going to see what else I can get done while the little people enjoy their cereal and the Wiggles.

I just realized I didn't tell you how much to use. It is about 2 tablespoons to 3/4 cup hot water.

Friday, January 27, 2012

Pineapple Upside Down Cake

I have been thinking about making this cake for a long time. OK, so it has been about a week. Now, at first I wanted to make chocolate raspberry cake which would be new, but then I decided I wanted to go with something tried and true, pineapple upside down cake it is.

I know what you are thinking, pineapple upside down cake it a lot of work. First you have to find a pan and then you have to make the brown sugar caramel and put the pineapple in the pan and put the little cherries in the pineapple and then make a cake. OR you have to go to the grocery store and buy one. That can be a total pain.

So, instead of making the traditional cake I decided to go with the next best thing (or perhaps even better...depends on the day). And just what is better than ooey, gooey cake? A cocktail, that's what!

Here are the ingredients:
If you haven't had UV Cake Vodka yet, stop reading this blog, get in your car and get yourself to the nearest liquor outlet. Seriously, it is that good.

This is a pretty easy drink to make, just add the pineapple juice to the vodka and you are on your way. Now, to make it a real glass of pineapple upside down cake you should add just a bit of grenadine. I didn't have any and I didn't want to buy any so I left it out. Really, it isn't necessary.
It is still really really good.

You can apparently make any kind of cake with the right mixer. Lemon cake, orange cake, root beer cake (ok, not a real cake but I think it would be good). We also tried a shot with cake vodka and Bailey's. It was very good.

The only warning I will give is that this stuff is dangerous. It tastes like frosting.

So, the next time you have a craving for cake, but don't want to bake-drink it!

Oh, and how was I planning on making chocolate raspberry cake? I was going to mix cake vodka with chocolate raspberry wine. I'll let you know how it turns out.

Thursday, January 19, 2012

Best Project EVER!

Ok, this post is about my favorite project so far. Not only is it my favorite it is by far the easiest. Yes, even easier than the to-do list.


This project wasn't a solo endeavor, it was a family affair. So, what am I talking about you ask? A Blanket Fort of course!


It all started when I was playing a new game with the little people-Peek-A-Boo Hide and Seek. Basically, the kids would run around the corner and count (1, 2, 3, 4, 11) and I would "hide" under a blanket in the middle of the floor, then they would find me. Great fun! Then we started reading stories under the blanket. That was fun too, but it got very hot. So, I thought why not use the card table currently protecting the CDs from little hands as a base for a fort. Just then my husband said "Use the card table for a fort" (duh! I'm going to). And from this our fort was born. Lots of pictures will follow, but I also want to share a few things I learned.


1. Forts were bigger when I was smaller

2. We need a bigger card table

3. Forts are all fun until the next morning when your little person wants to play in the fort instead of going to daycare. "NO SCHOOL! PAHLAY"

4. It really isn't the expensive toys that make memories, it is the simple things.

Here are some pictures from Fort O.


Stir-Fry

Just so you don't think I only feed my family rice I thought I would share the stir-fry I made to go with it.


The supplies:This is a really easy meal, just chicken, frozen veggies, and stir-fry sauce. I really like the bottled stir-fry sauce. Yes, I could make my own but this one is good and easy, and fairly inexpensive. Next time I will use 2 bags of veggies. I thought I had 2, but I could only find one. Plus, this was a sugar snap stir-fry but there weren't many snap peas. I was a bit annoyed. the worst part of making the meal is dealing with raw chicken. YUCK! I hate raw meat, but I REALLY hate raw chicken.


But the end result was good:

Rice

Yep, that's right today's blog post is all about me making rice. Now, I know what you are thinking..."Boil water, add rice, wait, viola...rice!" And to that I say "I never promised an exciting post."


So, here is the deal. This blog post is not just about making rice, it is about me conquering rice. Getting the best of rice. Making rice my, well this is a family blog so we won't go there.


I have a problem making rice. I just can't seem to do it. I really can't make Minute Rice, but that is ok because it is more expensive than regular rice so I'm just not even going to bother. In the last 2-3 weeks I have tried to make rice as many times. First was the "Mexican" rice for the tacoladas...enchilada sauce+water+rice=nasty undercooked rice. Then I wanted rice with soup sauce so I did some research and found that cream of chicken soup+water+rice=nasty undercooked rice. That was it. It was on. This challenge was now personal. I was not going to let a little thing (literally, a little thing) like rice get the best of me. I was trying one more time. To better my odds I decided to go with plain rice. No fancy pants rice for me. Just plain old white rice to go with my stir fry.


Here are the supplies:

Now, the package said butter was optional, but I wasn't taking any chances, so in it went. The package also said 1 3/4-2 cups of water, so to be safe I went halfway between the two.


The result:


Fluffy, yummy, not crunchy at all rice!!


Yay! I won! Dinner was saved. Next time I'll even make enough rice.

Friday, January 13, 2012

Update

Yeah, that chicken filling as dip is great. Like I said I added more ranch to up the flavor. I also microwaved it, not so it was warm but more so it was soft and spreadable. VERY GOOD.

Chicken Puffs

Lately I've been posting about a lot more food than I thought I would. I guess that is probably because you have to eat every day so even if I'm not being super creative I can always come up with a blog post about dinner. Hopefully, this weekend I'll be working on (and maybe even completing) and unfinshed project, so I'll be able to share that with you. Once I finish that I can move on to my next Pinterest project.


And actually, this meal was based on a Pinterest recipe. The recipe I used as inspiration was http://jennasjourneyblog.blogspot.com/2010/09/chicken-roll-ups.html


Here were my ingredients:


1 rotisserie chicken shredded (I know you are wondering why I would buy a one legged chicken since that is what is in the picture, but I did not buy a one legged chicken. This chicken had 2 legs, but I removed one before I remembered I wanted the whole chicken in the picture. Now, mind you I would buy a one legged chicken it it were cheaper than a 2 legged chicken and I didn't have plans for the second leg)


Ranch dressing mix (You might notice this is not in the original recipe. I did not notice this. The note on the picture I pinned mentioned ranch dressing mix so I assumed it was in the recipe. Well, it wasn't in the recipe but I had some so I used it)


Cheddar and pepper jack cheese ( i used pepper jack rather than plain monteray jack)


Jumbo cresent rolls (don't use the regular size ones, I don't think they would work very well)


The clementines are an optional side. The truth is I just didn't want to move the box before I took the picture. I will say that these are not the Cuties but some other brand, and I don't like them. they are harder to peel and have a lot of seeds in them. I have to figure something out with them becuase I don't want to give the little people oranges with seeds, but I also don't want to pick them all out. The one I had the other day had a lot of seeds. I should have another, maybe it was a fluke.


I made a double batch of these, but you could make a single one too.


Mix everything together. I only used 1 package of ranch mix, but I think I should have used 2. It should look something like this:


Yummy! Ok, it tastes much better than it looks.


Next you want to unroll your cresents and put a big blob of the filling on the large side. Roll up the cresent roll sealing the filling in. You will end up with little packets that looks a little something like this:


Bake them up and here you go!


This one is actually from the second batch I baked and they burned on the bottom. I don't know why, but they did. But they looked much better from the top, so that is what you get a picture of.


OH! And I skipped the step of putting butter and breadcrumbs on the top, seemed like too much work.


All in all I liked these. I don't think my family were very big fans. They were a little bland. I think more ranch and/or maybe a can of green chilis would have helped liven things up a bit.


I did end up with a fair amount of filling left in the end. I kept it and turned it into a dip. I added a bit more ranch to it for added flavor. I think it turned out ok. I brought the dip to work so we are eating it cold. But I do think it would be very good heated in a little crock pot and served with chips. If you add the green chilis I think it would be a fabulous dip.


I did enjoy the little puffs of goodness so I do have plans to try a few more things wrapped in cresent rolls. If you have suggestions, I'll take them. Note, my family loves hot dogs in cresent rolls, so no need to suggest those little classics.

Tuesday, January 10, 2012

Crap I Made This Weekend


Ok, so there aren't many pictures to this post, but that is because I was bound and determined to be so freaking productive this weekend even I wouldn't believe. So, there was no time for silly things like pictures. And I forgot to take them.


I thought Saturday morning would be a good time to get things done for the coming week. My plan was to cook the ground beef for the chili on Sunday, make soup for my lunches for the week, make a chicken and noodle casserole to freeze for later in the week, and make a ham and broccoli casserole for later as well. All in all I give myself a B for this effort.


Brown ground beef-done. Nothing exciting to report here. I browned ground beef, what more can I say.


Make the chicken and noodles-done. Man, I always forget that if I make the full bag of noodles it is going to be a BIG batch of chicken and noodles. But the good thing is I have a big pan and a smaller pan in the freezer. My tip of the day, when making chicken and noodles put the frozen peas in the bottom of the colander you will use to drain the noodles. Then when you pour the boiling water and hot noodles over the peas, they thaw. It works great. If you use fresh peas you are probably and overachiever.


Make the ham and broccoli-not done. I didn't have enough cream of chicken soup. And while I fully intend to try to make my own cream of whatever soup, that was not the day. So, I figured I would make it Sunday. Then on Sunday I thought, well I'll just make it Monday because it would get eaten on Tuesday and can you make something Sunday and eat it on Tuesday? Then last night I talked with my good friend on the phone for a long time and didn't get the casserole made. Tonight while I'm at wine club the husband and kids are having ham, broccoli, and cheesey shells for dinner. Works for them, works for me, we are all good.


Make the soup for lunch-pretty much done, finished on Sunday. Ok, the soup I was going to make was this recipe found of course via Pinterest http://www.pillsbury.com/recipes/slow-cooker-beef-and-barley-soup/1280e771-8e0c-4ae9-94a3-445d2a045438/ Doesn't it look good?


So, here is what I did different. I only used 1 pound of meat because I wanted to cut some of the calories. I cut 1 lb of stew meat into small pieces. Then when I went to get the frozen veggies I decided just to get a bag of frozen peas, carrots, green beans, and corn. Then I didn't have to deal with peeling carrots.


Well, things didn't really turn out. First, I overcooked the barley. I kind of forgot that I had it on when we went to my in-laws for dinner and didn't remember until before bed. The soup wasn't really a soup anymore it was as stew. Ok, not a problem. I went to bed and set my alarm so I could get up in an hour or so to put the somewhat cooled soup in the refrigerator. The next day I needed to add the veggies so I just thawed the veggies and stirred them in.


This is what it looked like:

Not pretty, and actually kind of slimy because of the overcooked barley. But the good news is that it made a lot Each container has about 3 cups of stew in it. That is way too much for one serving, that is a good two servings.

The soup was ok, but really bland. It needed salt. Also, the veggies should have been cooked with the meat and whatnot. Next time I'll make it according to the recipe (well, I still won't brown the beef first, might as well be honest) and have some extra beef broth on hand. Some of my lack of salt could be because I used the reduced sodium beef broth.


The only other thing I made was the start of a prayer shawl for my church group. I have a big chunk of it done and will show you it when it is done.

Tacoladas

This is the first post in a series with very few pictures. I know, not very exciting. The truth is sometimes I start working on something and either forget to take pictures before, during, or after, or I don't realize that it could be a good blog entry at the time. At the time, I'm just thinking "dinner". So, I apologize for all the words. But, as always if you don't like it, don't read it. I do however promise not to use too many big words, so it should be a quick read. Great, now I totally want to use big words. Luckily, I don't know too many big words and I'm too lazy to reach up and get my thesaurus.


Tacos are a staple meal at our house. We eat them once or twice a month. Everyone likes them, even the little people. Heck, they had a farm themed taco party for their birthday. A natural combination if you ask me.


Well, the other night was taco night and I had 3 pounds of hamburger to work with. Normally, I only use 2, but decided to cook it all up because we needed some for chili that week too. Then I decided I would just make it all into taco meat and we could have leftovers. The following is my attempt at repurposing a previously cooked meal, or making leftovers for dinner.


I didn't want to just make tacos again so I decided I would make tacoladas, or taco enchiladas.


Here is what I had on hand (this is the only picture, so enjoy):
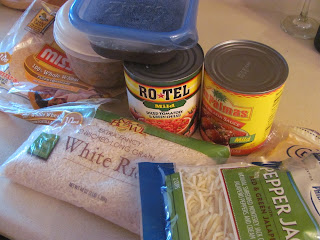
In the containers are taco meat, and about 1/2 a can of black beans. The second bag of cheese that you can't really see is just plain cheddar.


(A note about taco meat. We mix together ground beef, taco seasoning, and corn, yes corn. It is great. If you have never done that you should try it.)


I made the rice using part enchilada sauce and the rest water. I think I used about a cup of enchilada sauce. The rice tasted pretty good, but it didn't cook all the way. I don't know if it is because there wasn't enough liquid in the sauce or just because I can't make rice. It could really be either one.


I drained the beans and then mashed them up before mixing with the beef. I don't really like beans so mashing them up lets me eat them and not be bothered by them, because I don't really know they are there. Ok, I know it (because I made it) but I don't notice it. Then I mixed in the rice. Oh, and actually, I thought there could have been more beans. I just didn't want to open another can because we needed those for chili and I didn't want to go to the store...again.


I then filled tortillas with the mixture and put them in a sprayed glass casserole dish. I made 6 very full tacoladas. I could have made 2 more but I ran out of room in my pan and didn't feel like washing a bigger pan. So, I took the extra filling an put it on top. Put some more sauce on it and then topped with cheese.


I baked them up and Voila! tacoladas.


These were very good. Something different from your usual taco or enchilada. The only problem was that the rice wasn't cooked. That was kind of gross. But that can be fixed. It was a fun way to kind of pillage the pantry to use things up. I am going to try to repurpose leftovers more often.

Wednesday, January 4, 2012

To Do List

Ok, since I got many requests for instructions on how to make the framed to do list shown in my last blog entry I thought I would give a quick tutorial. Ok, fine, busted, there weren't many requests my sister asked how to do it-but she asked on Facebook so I bet there were many that read her request.


Anyway, this is another very easy and impressive project.


Here are the supplies:


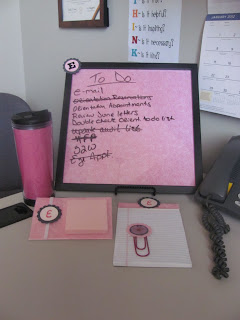
All you need is a 12x12 frame and some 12x12 scrapbook paper. I also have a frame stand that I put my to do list frame on but you could add magnets to the back and put it on the refrigerator, or hang it on a wall, or just lay it on your desk, whatever works for you. You will also need a dry erase marker.


All you do is open the frame and put the scrapbook paper in it, then put the back back on the frame. I put several sheets of paper in mine, including a calendar sheet, so you could change the look whenever you want.


You can also customize the frame anyway you want. But if you are in a hurry or feeling lazy, a plain frame works great too.


When you use a dry erase marker to write on the glass it wipes right off. Did you know this? It is a good thing to know if you ever want to leave notes on mirrors or windows.


Here are a couple notes about the supplies.


Frame-If you buy the frame at Hobby Lobby they aren't with the regular frames. They are back by the framing section with the wall frames. That is why mine doesn't have a stand on the back. You could probably have a stand added, but that would cost extra.


Paper-You want things that you are going to be able to see writing over. Don't use really dark paper or something that is very busy.


General-Do not pay full price for any of these supplies. Wait for the paper go to on sale at Hobby Lobby and either wait for the frame or use your 40% off coupon. I know this has been said before, but it is crazy to pay full price at Hobby Lobby...unless it is a genuine 9-1-1 worthy crafting emergency.


So here it is, a cute and customizable to do list.


This picture didn't turn out real great, but if you check the Desk Set blog entry you can see one in action.

Guest Post-Paperclip Bookmarks

Emily sometimes has posts that fall into the category of: “Crap my kids make.” Today’s post falls into the category of “Crap Emily’s friends make.” What qualifies me to make this post you ask? Well, I’m a friend of Emily’s and I make crap—need I say more?

Emily’s posts and crap (oops—I meant crafts!) inspire me to look at things and think: “Why buy that? I can totally make that.” Recently I even saved a Kleenex box and aluminum can because I had a vision for desk supplies (but that is for a later post and yes I probably need an intervention!)

Inspired by Emily one Saturday morning I found myself accompanying her to a mecca of sorts for us—a crap (I mean craft) fair—where there is a crap load of ideas of things you can make instead of buy. We made our way around as I tried to take photos of things we wanted but of course had no plans to buy. Soon we came upon a stand where a nice lady was selling fun little bookmarks. Since lady was standing there and not moving I knew I couldn’t sneak a photo so I ended up investing in one bookmark to utilize as a prototype for the project.

I would need a few supplies to make these and it was not hard to convince Emily (hello—she is the author of a blog entitled: “52 Weeks of Crap I Make”) to go to the 2nd mecca of the day—yep, you guessed it. The Lobby of Hobbies (where you should NEVER pay full price for anything and nobody is happy—but that’s for another blog post too!) There I picked up the necessary supplies-- a Fiskers punch, a glue gun and a few packs of large paperclips. You will also need several small pieces of decorative paper but if you are a scrapbooker like myself you have mountains of small pieces of paper to use!
Here are the supplies:

Use your Fiskars punch (I bought this one: http://www2.fiskars.com/Products/Crafting/Punches/Squeeze-Punches/Seal-of-Approval-Squeeze-Punch-Large) to punch out multiple shapes. I then used my Creative Memories cutter system to cut out smaller circles that could fit inside the punches I had just made (you could use any cutting system or perhaps you are more talented than myself and could free-hand cut the circles. If I did that it would like a kindergartener had cut them!) I then used glue sticks to glue the smaller circles onto the shapes I had punched out. The prototype I purchased used two punches from a solid color of paper per paperclip with a smaller circle from a designed piece of paper only glued on the punch that will be the front of your bookmark. You can get creative and mix it up any way you want. I also used some white paper and stickers from my stash (did I mention I am a scrapbooker? Scrapbookers have stashes!) to make some of them more personalized.


For the punching and creating of circles, I recommend you do it in an assembly line/mass production of sorts to make it most efficient for yourself—get all that cutting/punching work out of the way 1st and then get to the gluing!


Once you have created your punches the way you want them, pull out your trusty glue gun and glue them front to back to the top of your paperclip. I found it easiest to line the top of each side of the clip with glue and then match up the punches front to back to attach to the top.
I gave these as gifts at my book group holiday and they were a hit! They are also a great addition to an office/desk set you make for anyone (see Emily’s earlier post.) I really like that you can personalize them and no two of them are alike!


And here is the finished product:


So fun! And special thanks to Emily for allowing me to guest post about the CRAP she inspired me to make!

Tuesday, January 3, 2012

Double Sided Tape

So, there are no pictures to go with this entry, just a story. But it is a fairly embarrassing story, so I thought I should probably share it in case others had ever found themselves in my place.

As I mentioned in my last blog post I used double sided tape to make the desk set for my sister. I didn't use fancy scrapbook double sided tape, I just used plain old Scotch brand double sided tape.

I was all set to go and tape something. I tore off a piece of tape and started working on taking the paper backing off. It would not come off. Not at all. Not even a little bit. Ok, let's just start over. I took off another piece. Still nothing worked. I couldn't get a finger nail under it, I couldn't peel it off by folding, swearing at it didn't help, it just wouldn't come off. I was so frustrated and ready to call my crafting buddy (who also scrapbooks) to find out the trick for this stupid tape. Only, by that point, stupid wasn't the adjective I was using. I decided to give it one more shot before admitting my complete inability to use tape to a friend. So, while pulling off another piece of tape I figured out my problem. Yeah, that tape doesn't have a paper backing. The first bit is just covered on one side for packaging purposes. I didn't need to peel anything off, I just needed to pull more tape off the roll. Once I did this there were no problems getting the tape to stick on both sides.

Moral of the story-sometimes things aren't as difficult as I make them out to be. And when in doubt, just pull off more tape.

Desk Set


Hello and welcome back from the holidays.


I have to say for me this was a very Pinterest Christmas. Gifts inspired by Pinterest were made by me, a good friend, and my sister. And let me tell you they all turned out great! The next few installments were going to be called to be "Crap I made as Christmas Gifts So I Couldn't Blog About Them Until Now So The Surprise Wasn't Ruined" followed by the name of the project. Except that became a lot to type, so I'm just going with the name of the project. Feel free to add the part about Christmas before if you would like.


The first project I want to share is a desk set I made for my sister. I absolutely love these sets and will totally make more as gifts. The set I made included a Post-It holder, pen, and a set of notebooks.

The Supplies:
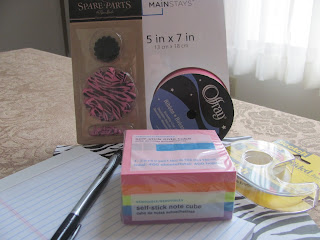
What you need for the project really depends on what you want to make. For the Post-It holder I used a 5x7 acrylic frame, but the 4x6 work well too. And portrait or landscape will work. I found double sided tape worked well for some parts but I used a glue gun for others.


Ultimately you will need whatever you are embellishing, adhesive, a piece of scrapbook paper (you could use scraps if you have them) and whatever embellishments you want.


At this point you should probably know this isn't going to be much of a tutorial. Most of the projects are pretty easy to figure out. Heck, if I can do them, I'm sure you can.


Post-It Holder: This part is probably the easiest. Cut your paper to fit in the frame and frame it like you would a picture. I did add a small piece of double sided tape to the back to hold the frame together. Then figure out where you want your notes and stick them on. You might need to use some hot glue to keep them from falling off. Add embellishments and you are done!


Pen-I used the Sharpie brand pens for this project because the caps don't have clips that get in the way of anything. Cut a strip of paper as long as the part of the pen you want to cover and wide enough to go around the pen probably twice. Carefully put a piece of double sided tape along the pen being careful to keep it straight. Then carefully line up the paper and start wrapping it around the pen by carefully rolling the pen. When the paper starts to overlap add another strip of tape and then another at the end to hold the edge. Did I mention that you should be careful when you do this? You want to be careful to keep everything straight so your paper lines up nice. I added a flower embellishment but you wouldn't have to.


As for the notebooks, these are seriously great and very impressive. All you do is take whatever size notebook you want (make sure it has the binding that flips over the top of the page and not just a glue binding). The ones I used were the ones that look like mini legal pads. You can get them in many colors, but I liked white. Then all you do is cut a strip of scrapbook paper the length of the notebook and wide enough to wrap around the binding. I used double sided tape to stick the paper to the notebook but a glue stick would also work. Again, I added embellishments.


So, here is how the set turned out:

Just in case you don't think these sets would work in real life, here is one I got as a gift (did I mention it was a very Pinterest Christmas?)

This set also included a To Do List (there will be a post about these very soon) and a travel mug. Now, it is my understanding that the travel mug wasn't supposed to be included but inspiration struck the creator during a trip to K-Mart. The giant paperclip is also very cool. Perhaps the creator will do a guest blog explaining these (hint, hint, hint). Oh! And this note holder is a 4x6 rather than a 5x7. I think I like the 4x6 better, but when I was buying the frame I couldn't remember the size I needed.


As you can see this is a very versatile project that could be customized in a lot of different ways. So, if you know someone graduating (school colors/logo theme) or starting a new job, or that is just hard to shop for, think about a desk set. After all, they are much harder to kill than that plant you are considering.